

A card scraper is one of the most effective tools for finishing wood surfaces – provided it’s properly sharpened. The key to sharpening a scraper is forming a burr (hook) that allows you to take clean shavings without dust. In this guide, I’ll show you – step by step – how to sharpen a scraper by hand using a traditional method.
For many people, sharpening a scraper feels time-consuming and often comes without a guaranteed result. That’s why some woodworkers avoid it and reach for alternatives, such as sandpaper. The problem is even bigger when it’s combined with a lack of proper scraping technique.
In this post, I’ll walk you through the process of sharpening a scraper, step by step.
 If you want to learn correct hand-tool technique, check out my hand-plane course:
Woodworking Courses: Hand Planing and Scraping – Bensari Workshop.
What is a card scraper?
A card scraper is a piece of hardened spring steel – rectangular or shaped – used to finish wood surfaces or remove old finishes. It’s one of those unfairly forgotten hand tools, deeply rooted in traditional woodworking techniques. A scraper cuts the wood rather than abrading it, which is why it can leave a cleaner surface than sandpaper.
If you’re just starting with hand-tool woodworking, be sure to read my post about essential hand tools for woodworkers:
Basic Woodworking Tools — Where to Begin? – Bensari Workshop
Is a wood scraper still used today?
In hand-tool woodworking, a scraper should remain the first-choice tool for difficult grain, knots, and final surface refinement. Many people, however, associate scrapers mainly with stripping old finishes from furniture. In industrial production, scrapers have been almost entirely replaced by sandpaper. The main drawback of a scraper is the learning curve both – in sharpening and in use – which is why many small shops rarely use them today.
In my shop and in the shops of many experienced woodworkers thanks to the plane–scraper combination, sandpaper plays a very limited role. In practice, we use it only for the very final cleanup of the surface. This is another area where traditional techniques still win.
Is a scraper better than sandpaper?
Sandpaper is convenient because it’s trouble-free. But in many situations a scraper is faster than rotary or random-orbit sanding – though it does require more effort and practice. A scraper doesn’t create dust and it doesn’t pack wood pores with abrasive debris.
Do you sharpen a card scraper?
Yes – but in a distinctive way. The goal is to form a burr (hook) that cuts the wood surface. Sharpening a scraper is about controlled shaping of that burr, not about grinding a conventional cutting edge.
How long does it take to sharpen a scraper?
For an experienced woodworker, refreshing a dull scraper takes a few dozen seconds. Fortunately, the process isn’t complicated, and it’s easy to become proficient with a bit of practice.
How can you tell if a scraper is sharp?
A properly sharpened scraper should produce a continuous shaving, as shown in Photo 1.
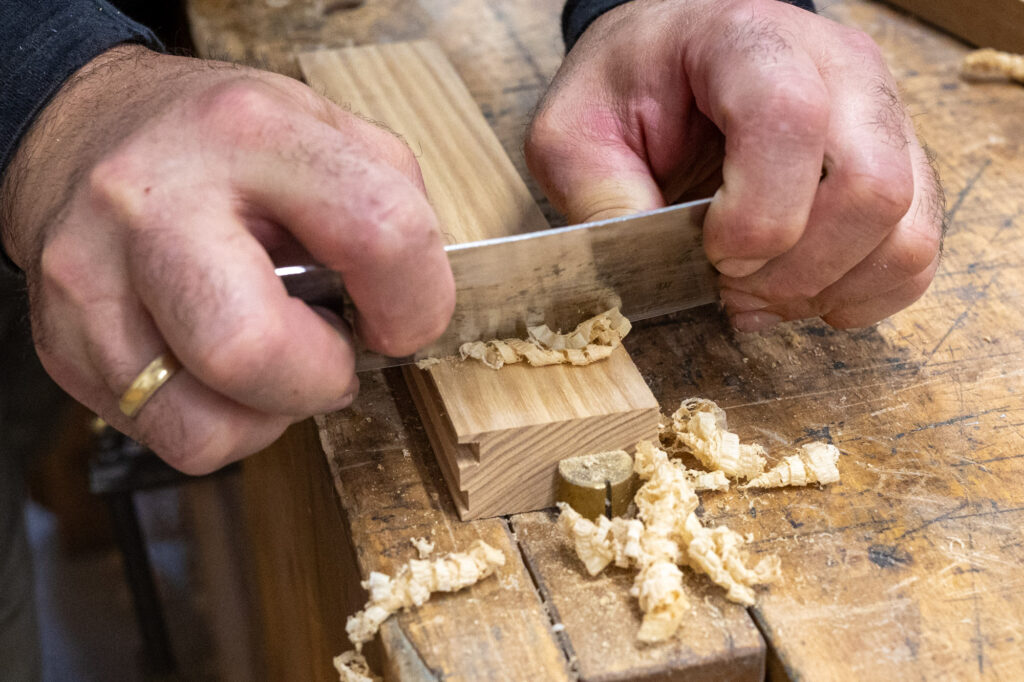
It’s worth adding that this is how a scraper behaves when it is both properly sharpened and properly used.
- If the scraper doesn’t produce a continuous shaving, it may be dull – or it may be held incorrectly.
- A dull scraper produces dust or very fine, broken shavings regardless of how well it’s held.
- Sound is also a clue: a scraper shouldn’t “whistle” or “squeal” (some people get chills). A properly used scraper makes a cutting sound without whistling or squealing.
- With a very dull scraper, whistling will happen no matter whether you hold it correctly or not.
Those who know how to use a scraper can feel in their fingers whether it’s sharp, at what angle it’s cutting, how much to bow it, and how to guide it. After a few weeks of scraping, you’ll discover this yourself. If you want to learn how to sharpen scrapers, you must learn scraping technique at the same time – there’s no other way.
How to sharpen a rectangular card scraper step by step
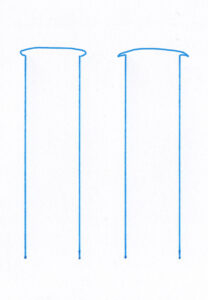
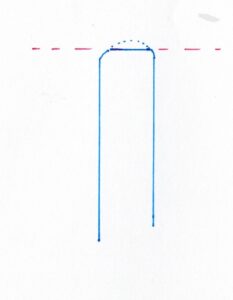
A worn card scraper has the edge profile shown on the left in Figure 1, while a sharp scraper is shown on the right (schematic drawings). Sharpening a card scraper is a two-stage process. First, the edge geometry is restored to its original form (a square edge in the case shown in Figure 1). Second, the cutting burr is created, which is responsible for the scraper’s cutting action.
A standard rectangular scraper has four edges, and it’s worth sharpening all of them in one session. To keep things simple, I’ll describe sharpening two edges on one face of the scraper. The other two edges are sharpened the same way. To sharpen a scraper, you only need a burnisher, a coarse stone to true the edge, and a simple wooden block. The technique of burnishing and turning the burr matters far more than high-grit stones or specialized equipment.
Now I’ll show you, step by step, how to sharpen a scraper correctly.
Step 1. Turn back (remove) the existing burr – scraper sharpening
The goal of this step is to roughly restore the edge and shorten the overall sharpening time.
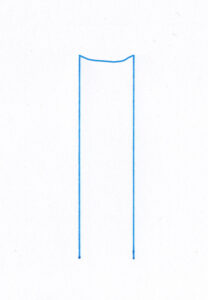
After many years of scraping, I discovered that turning back the old burr before honing dramatically speeds up the process. It also eliminates most of the sharpening problems described later. In addition, this “unrolling” has a steel-consolidation effect, and the new burr tends to be tougher. To do this, lay the scraper on its side and draw the burnisher along the edge, parallel to the face of the scraper, pulling the rod outward – just like in Photo 2.

After this, the scraper’s edge becomes slightly concave in cross-section, as in Figure 2. This makes it easier to hone back to a crisp, square edge.
It’s worth noting that Paul Sellers uses a similar approach, but he doesn’t turn the burr back before sharpening – he does it during the process and then forms it again. His goal is also steel consolidation and longer edge life. After sharpening, he burnishes the edge at 90°, then lays the scraper on its side to turn the burr back as described above, and then burnishes at 90° again. Christopher Schwarz – an American woodworker – described the same technique on his blog as a result of both experience and research in older sources:
https://blog.lostartpress.com/2019/03/20/how-to-sharpen-a-curved-or-flat-scraper/
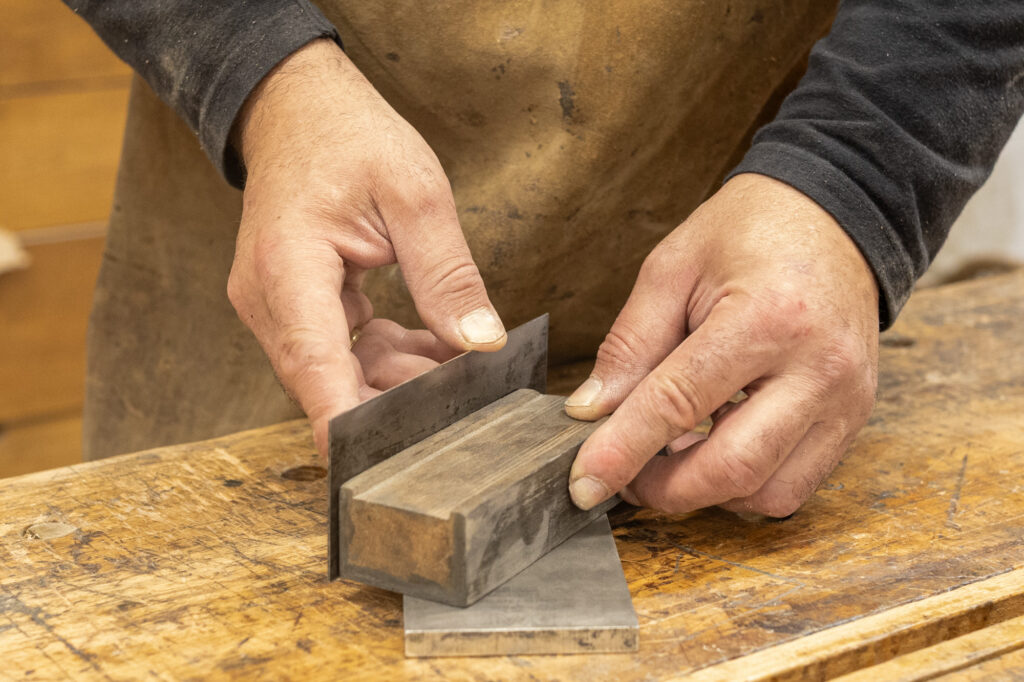
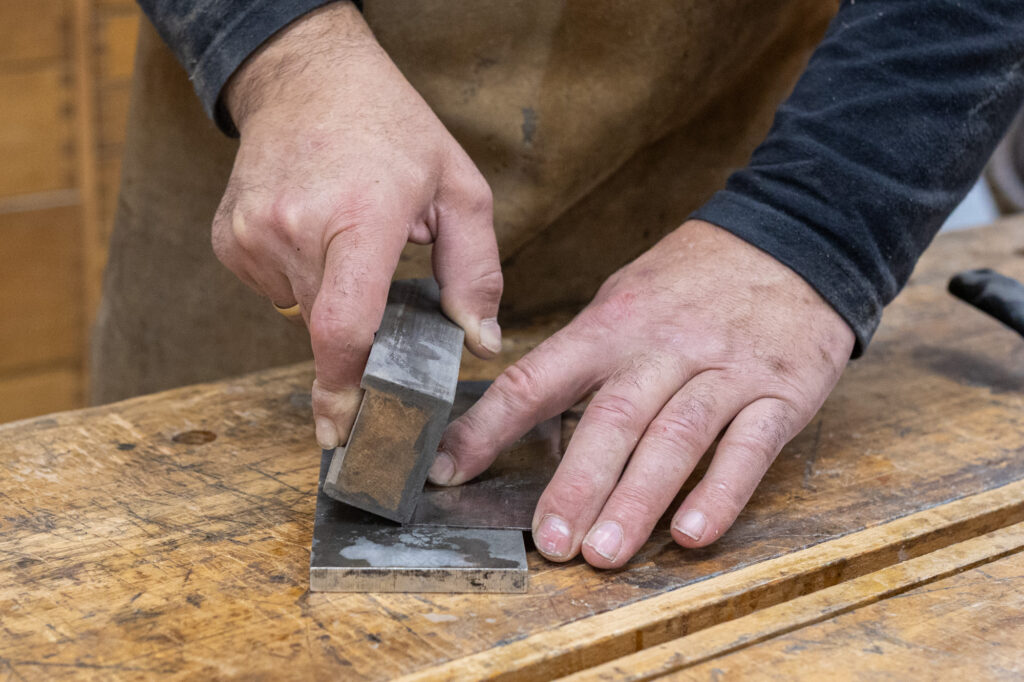
Step 2. True the edge – scraper sharpening
The goal of this step is to restore a perfectly square edge profile.
Use a coarse or medium-coarse sharpening stone and, with the help of a square wooden block, true both scraper edges (top and bottom) as shown in Photo 3.
In this article, I use “sharpening stone” and “whetstone” interchangeably to mean flat stones for hand sharpening – oil stones, water stones, or diamond stones.
The only requirement for the wooden block is that its faces are square. I used an old guide block originally made for sharpening the blade of a scrub plane.
Remember: don’t press hard. Excessive pressure can damage the stone – even a diamond plate.
Step 3. Hone the scraper faces – scraper sharpening
The goal of this step is to remove any remaining burr or wire edge that may have formed during Step 2.
Lay the scraper flat on one face on the stone and press its edge against the stone using the edge of the wooden block. Hone the first face, then the second face the same way – like in Photo 4.
After honing the faces, I often make a few vertical strokes like in Step 2, but that’s more habit than necessity.
There’s no need to work through multiple grits. Burnishing will polish the edge. The important thing is to remove the burr completely – your fingernail should not catch on any irregularities.
Step 4. Burnish the edge at 90° – scraper sharpening
The goal of this step is to smooth the edge and give it a slight “mushroom” shape, as shown in Figure 3.

Use either a dedicated burnisher or a good hardened screwdriver shank (it must be harder than the scraper).
Clamp the scraper as low as possible in the vise, as in Photo 5, so it doesn’t flex. With firm, energetic strokes, run the burnisher along the edge at 90° to the face of the scraper.
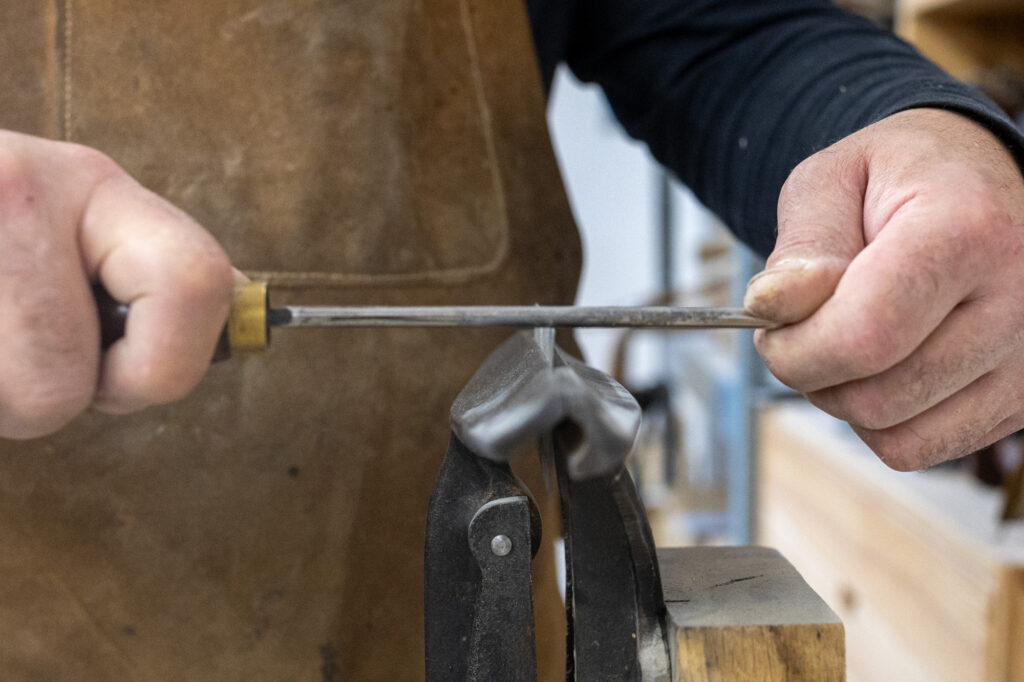
Make several passes. The number of strokes is inversely related to how much pressure you apply – so it’s hard to give an exact number. Over time, by comparing successes and failures, you’ll learn what works for you.
When burnishing the edge, it is worth:
- Lightly oil the burnisher (for example, wipe it on an oiled rag used for plane soles).
- Shift your stroke sideways to avoid wearing one spot on the rod.
Step 5. Turn the burr (burnish at an angle) – scraper sharpening
The goal of this step is to form and shape the burr that does the cutting.
Now it’s time to set the burr so the scraper cuts efficiently. A scraper that has been smoothed and “pre-burnished” in Step 4 might cut with the burr held nearly straight, but that would require a very steep working angle and would make it difficult to bow the scraper. Bowing the scraper increases stiffness, which is essential for controlled cutting. That’s why we need to turn the burr slightly – typically by 5–15° on rectangular scrapers.
The burr angle affects:
- the character of the cut (aggressive vs. fine),
- burr durability, and
- the working angle of the scraper.
I usually aim for about 10° – I don’t overthink it and do it by feel. With the scraper still clamped in the vise, take the burnisher and make a few energetic strokes with the rod slightly tilted, once from one side and once from the other – like in Photo 6.

After that, your scraper is burnished and ready to use.
What if the burr doesn’t form?
That usually means:
- you burnished too lightly – repeat the sequence,
- the scraper edge wasn’t trued properly (it isn’t square).
This often happens when, before sharpening, the edge had been heavily rolled in Step 5, and honing never reached the true apex of the edge – leaving it rounded, as shown in Figure 4 (the dashed red line indicates where Step 2 stopped too early).
What if the burr forms only on one side?
That may mean:
- the edge was trued at the wrong angle, as in Figure 5.
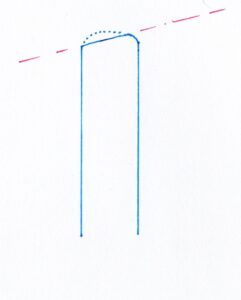
Figure 5. Truing the edge at the wrong angle can cause the burr to form on only one side. - you held the burnisher at the wrong angle (Figure 6), so the burr won’t develop on one side,
- you used the correct burnishing angle, but the scraper was clamped too high and flexed during burnishing (Photo 7), or it was clamped correctly but you pressed so hard that it flexed anyway.
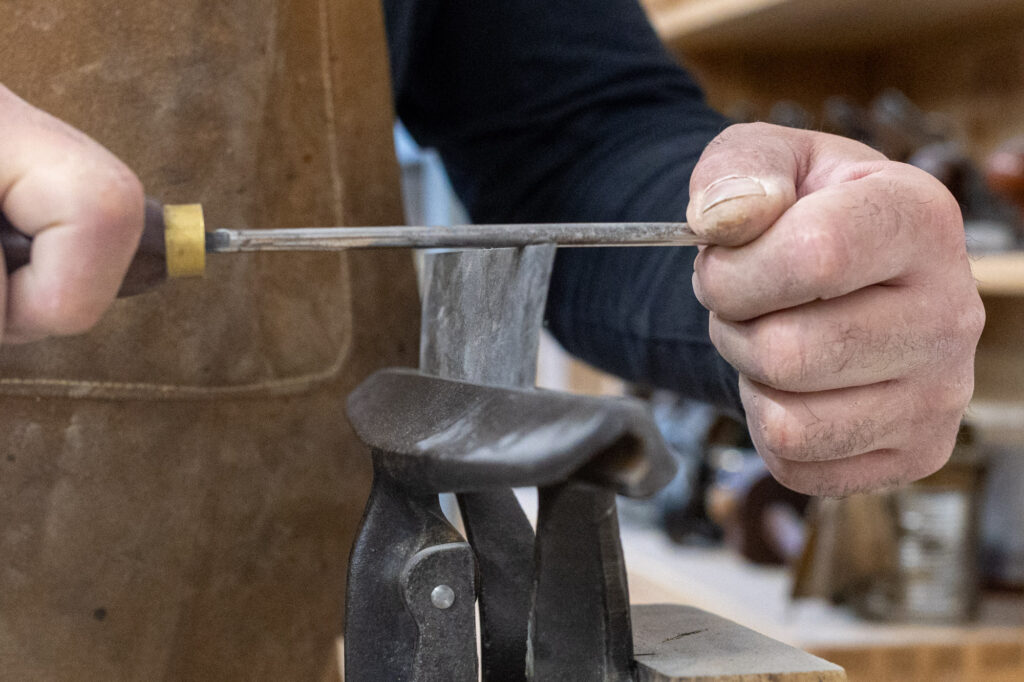
Photo 7. Clamping the scraper too high allows it to flex during burnishing, leading to an uncontrolled burr.
Remember: burnishing for too long can roll the burr unpredictably. Observe what you’re doing, count your strokes, feel the pressure, and compare it to the result.
Sharpening curved/profile scrapers
Sharpening shaped scrapers is essentially the same as sharpening rectangular ones. The main difference is convenience and difficulty.
- For inside curves, instead of flat stones it’s often better to use round metal files or small profiled slip stones.
- Some parts of the profile may be hard to reach, and you may not be able to turn a burr perfectly everywhere. In that case, you either accept the limitation or use a different tool.
All the other principles – truing the edge, burnishing, and turning the burr – remain the same as for a rectangular scraper.
Sharpening scrapers with a 45° bevel
You’ll often find scrapers that are factory-beveled at 45° – for example in tools like the popular Stanley No. 80 scraper plane (or similar models), or scraper planes such as those by Veritas.
Sharpening such scrapers requires only a small modification to the process:
- Turn back the old burr to match the bevel angle – here, 45°.
- Prepare a wooden block with a 45° notch so you can guide the stone or plate comfortably (see Photo 8).
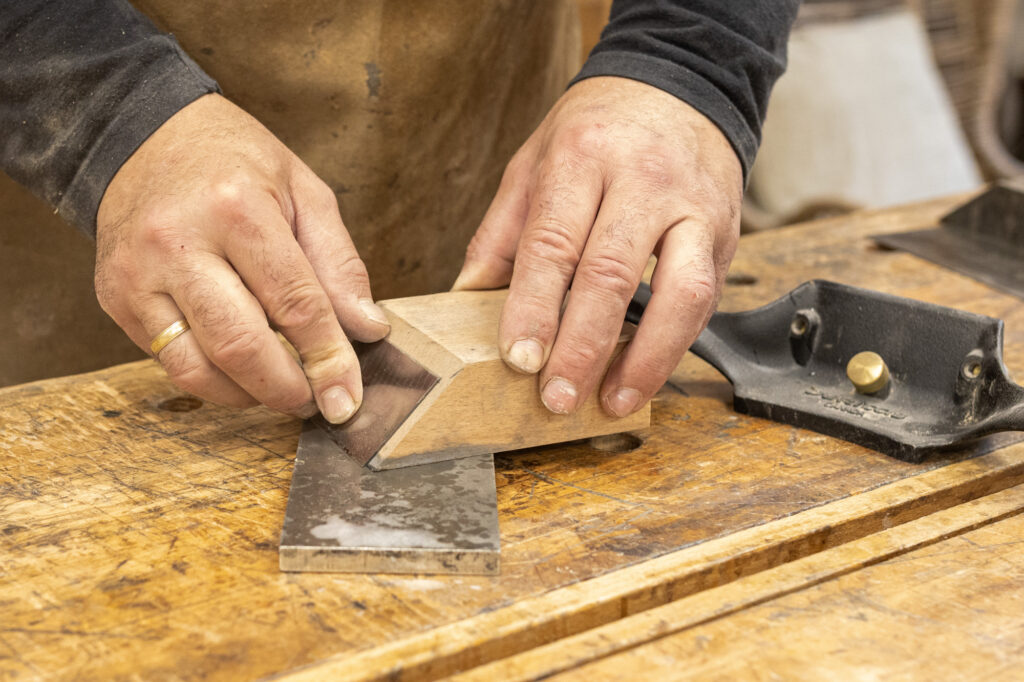
Photo 8. With 45° scrapers, maintaining correct geometry at the honing stage is critical. - In Steps 4 and 5 (burnishing at 90° and turning the burr), follow the 45° geometry to preserve the bevel.
- In Step 5, hold the burnisher 5-15° steeper than the 45° bevel-like in Photo 9.
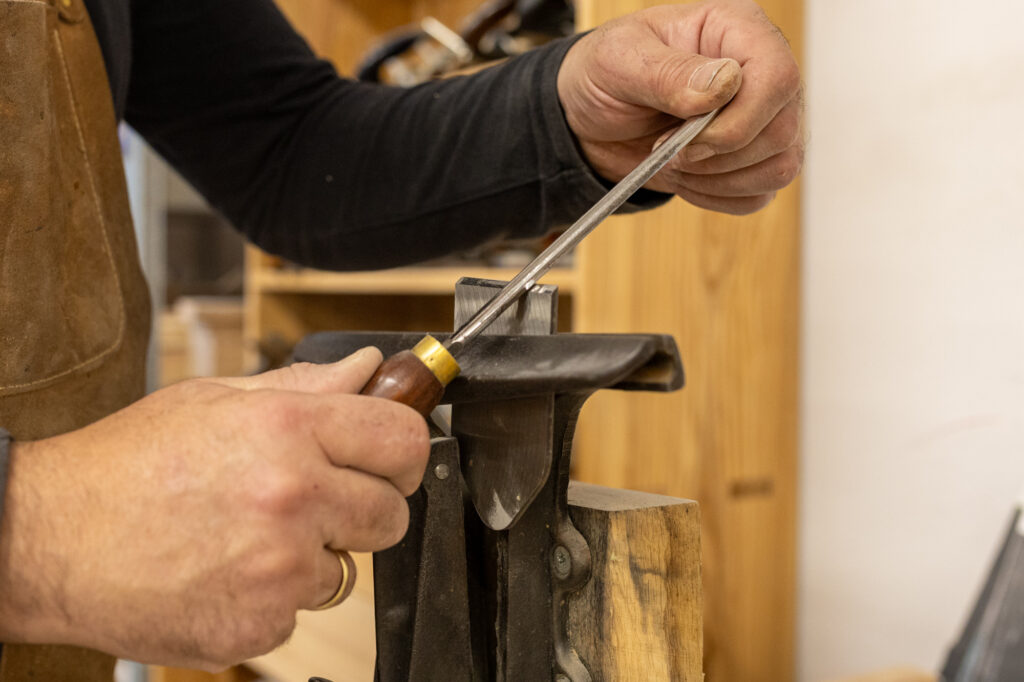
Photo 9. Burnishing at an angle slightly steeper than the bevel helps form a proper cutting hook in scraper planes.
This way, 45° scrapers can be sharpened just as effectively, and the burr will be set correctly for use in the tool.
What tools do you need to sharpen a card scraper?
You don’t need an extensive or expensive set of tools to sharpen a scraper. On a budget, a metal file and a screwdriver are enough.
The primary tool is a burnisher – a hardened, smooth steel rod. Its job isn’t to abrade metal but to plastically smooth and shape the scraper edge and to form the burr. In practice, you can replace it with a good hardened screwdriver shank – as long as it’s harder than the scraper steel.
The second essential element is sharpening stones (whetstones) in coarse or medium grit. Their role is to true a square edge and remove remnants of the old, worn burr or any wire edge. There’s no need for high-grit stones because the final smoothing happens during burnishing. Natural stones, synthetic stones, and diamond plates all work – as long as they’re flat.
Simple wooden blocks with square faces are also very helpful. They make it easier to hold geometry while truing the edge on the stone and allow for repeatable, precise work.
For convenience and repeatability, you can also use accessories such as the Veritas Variable Burnisher (to control the burr angle) or the Veritas Jointer/Edger (useful for quickly restoring heavily worn scrapers). They’re not necessary for effective sharpening, though – good hand technique is enough.
Most common mistakes when sharpening a scraper
- the edge isn’t square – the scraper wasn’t trued correctly,
- too much previous burnishing – after the edge dulls, honing doesn’t reach the true apex (Figure 4),
- the edge was trued at the wrong angle – the burr forms on only one side (Figure 5),
- uneven burnishing – one side is burnished more than the other,
- holding the burnisher at the wrong angle,
- clamping the scraper too high in the vise – it flexes during burnishing,
- too much pressure during burnishing – the scraper loses its geometry,
- burnishing too long – leads to an uncontrolled, rolled burr,
- too much pressure on the stone – risk of damaging the stone (even a diamond plate).
Summary – Sharpening a scraper step by step
A scraper remains one of the most effective woodworking tools for finishing wood surfaces because it cuts rather than abrades. Its effectiveness depends directly on correct sharpening and on a properly formed burr, which acts as the cutting edge. The sharpening process includes truing a square edge, smoothing it by burnishing at 90°, and then turning the burr at a small angle to allow controlled cutting. Turning back the old burr before sharpening significantly shortens the process and improves edge durability, resulting in more predictable, repeatable scraper performance.
FAQ – Frequently Asked Questions
How often should you sharpen a card scraper?
It depends on how intensively you use it. With continuous use, it’s worth refreshing the burr even every few minutes.
How quickly can you sharpen a card scraper?
Depending on experience, it can take anywhere from a few dozen seconds to a few minutes.
Can a scraper replace sandpaper?
For many tasks, yes – it leaves a better surface and produces no dust. Sandpaper is usually kept for the final cleanup (fingerprints, minor touch-ups, etc.).
What burr angle is best?
Most often 7–10°. A smaller angle gives a finer cut; a larger angle is more aggressive.
What’s the difference between a scraper and a hand plane?
A plane takes thicker shavings and levels larger areas; a scraper allows precise, often localized work – especially in hard-to-reach spots – or controlled work over larger areas on difficult grain (knots, twisted grain, working against the grain where a plane can tear out).
What are the best tools for sharpening a scraper?
A burnisher or a hardened screwdriver is enough, but for convenience you can use Veritas systems (Variable Burnisher, Jointer/Edger) and a coarse whetstone.
Do you need high-grit stones to sharpen a scraper?
No. A coarse or medium stone is enough. The key step is burnishing at 90°, which smooths the edge and prepares it for turning a burr – so high-grit stones aren’t necessary.
Why does the scraper “skate” on the wood instead of cutting?
Most often it means there’s no burr, the burr is too weak, it has been over-burnished, the burr angle is too small, the scraper isn’t bowed correctly, or the working angle is wrong.
Can you “over-sharpen” a scraper?
Yes. Burnishing too long or too hard can roll the burr too far; it may break quickly or become unstable. In that case, turn the burr back and true the edge again.
