
I run woodworking courses for both beginners and advanced hand tool users, and I believe that learning to work with a chisel should focus more on what not to do than on how to work with it. The difficulty of working with this tool lies in the fact that a chisel has neither a sole nor any fences that would guide it at the correct angle.
What chisels will we need?
To make dovetail joints, we will need several chisels that we will use to chisel out the spaces between the tails and the two outer sections of the base line.
How to choose the width of the chisels?
Chisel for working between the tails
For chiseling the spaces between the tails, it is best to use a chisel slightly wider than half the width of the socket. This allows you to work “in two passes” and maintain greater control over the tool.
Watch out!
- If you choose a chisel that is too wide, you must be especially careful at the corners. Even if the chisel seems perfectly fitted, its cross-section may damage the tails. Usually the cross-section of the chisel does not match the cross-section of the tails, and often the closer it gets to the handle, the thicker the chisel becomes.
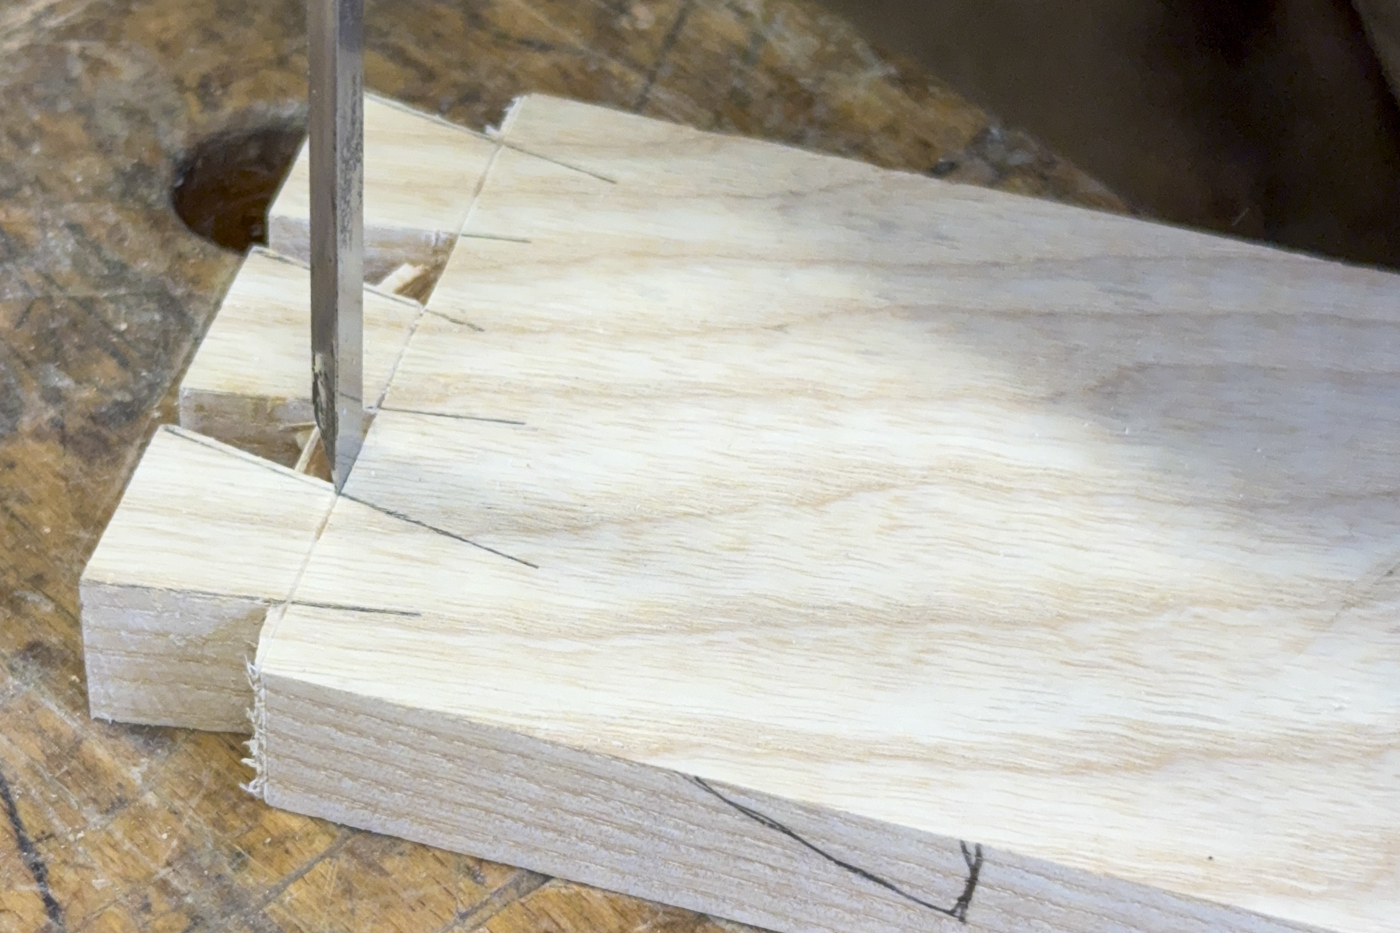
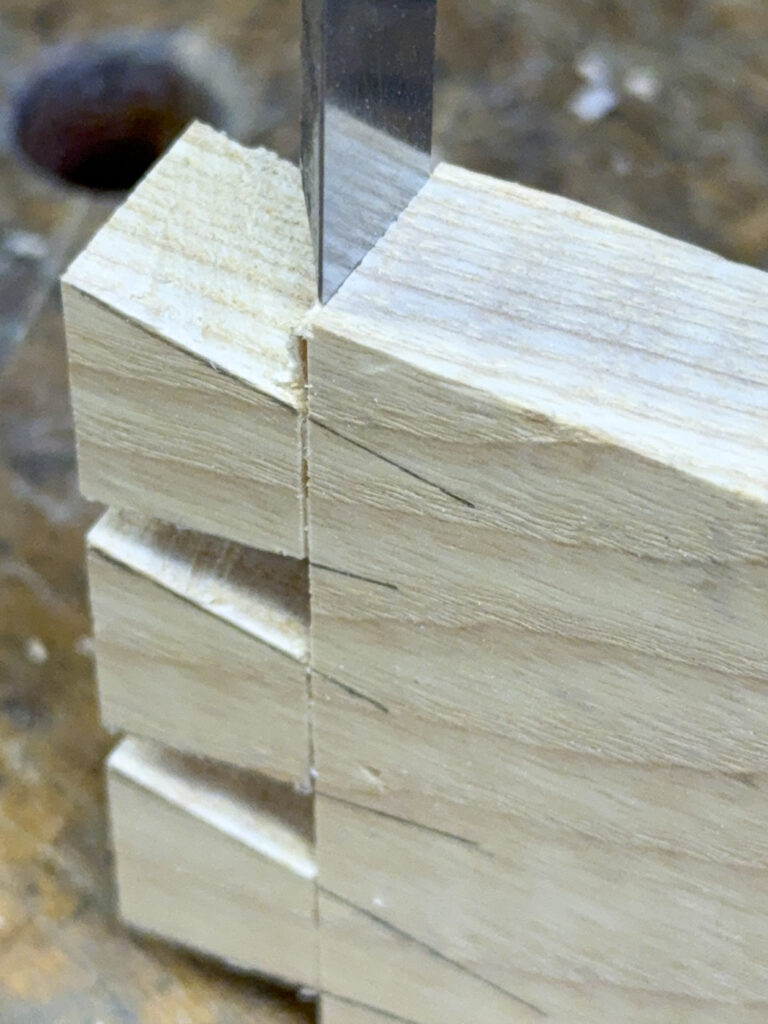
- Photo 1 shows the optimal situation. The chisel is slightly wider than half of the base line section between the tails. This allows it to be safely positioned on the remaining part of the base line to be chiseled. If we use a chisel that is too wide, we will be left with too small a section of the base line, the chisel will be more prone to twisting and, as a result, damaging this line. The twisting effect in this case results from the lack of equal resistance acting on the chisel edge. Hold the chisel firmly and do not let it twist.
- The same thing happens when we want to position the chisel too precisely and move it too close to the tail, meaning the corner, or slightly enter the tail with the chisel.
Chisel for working at the ends of the base line
The outer sections of the base line are more difficult to chisel than the spaces between the tails, because they require simultaneous control of two lines and perfect angle control.
- We must be careful, because we have three lines to chisel, not two as in the case of the sections between the tails.
- Any inaccuracy in this place will be additionally exposed, because these sections are affected by expansion forces. This is the opposite of the sections between the tails, where compressive forces act on the base line as a result of the construction of the joint. In these places, accuracy is a key condition for a proper joint.
Over the years, I have developed a method for precisely chiseling the outer sections of the base line. We will need one or two chisel widths. The first should be slightly narrower than the width of the element, and the second slightly narrower than the outer sections of the base line. “Slightly” means 1–2 mm, no more. It may happen that one chisel meets both of these criteria, or even all three, including chiseling the base line sections between the tails.
What type of chisel should you choose for chiseling the base line?
Dovetail chisels or fishtail chisels make it easier to work in narrow spaces between the tails thanks to the geometry of the edge adapted to the shape of the sockets.
There are many different types of chisels on the market and even more theories about their purpose and capabilities. Life, however, is simpler than the needs created by the marketing departments of tool companies. Let us therefore take a closer look at the subject.
Bevel angle
A skilled woodworker will manage with almost any reasonable chisel bevel angle. However, we can assume that if we chisel with a chisel with a larger bevel angle, that is 25–30 degrees, we must be more careful about compression. I devoted a separate blog post to the phenomenon of compression in chisel work: compression in chisel work.
Approach the base line gradually. If we take a chisel with a bevel angle close to 20 degrees — I work with such chisels — it will create significantly less compression, and therefore we can chisel more safely. Such a chisel, however, is not suitable for cutting away waste. Use it only if you have initially removed the waste, for example with a coping saw.
Chisel cross-section
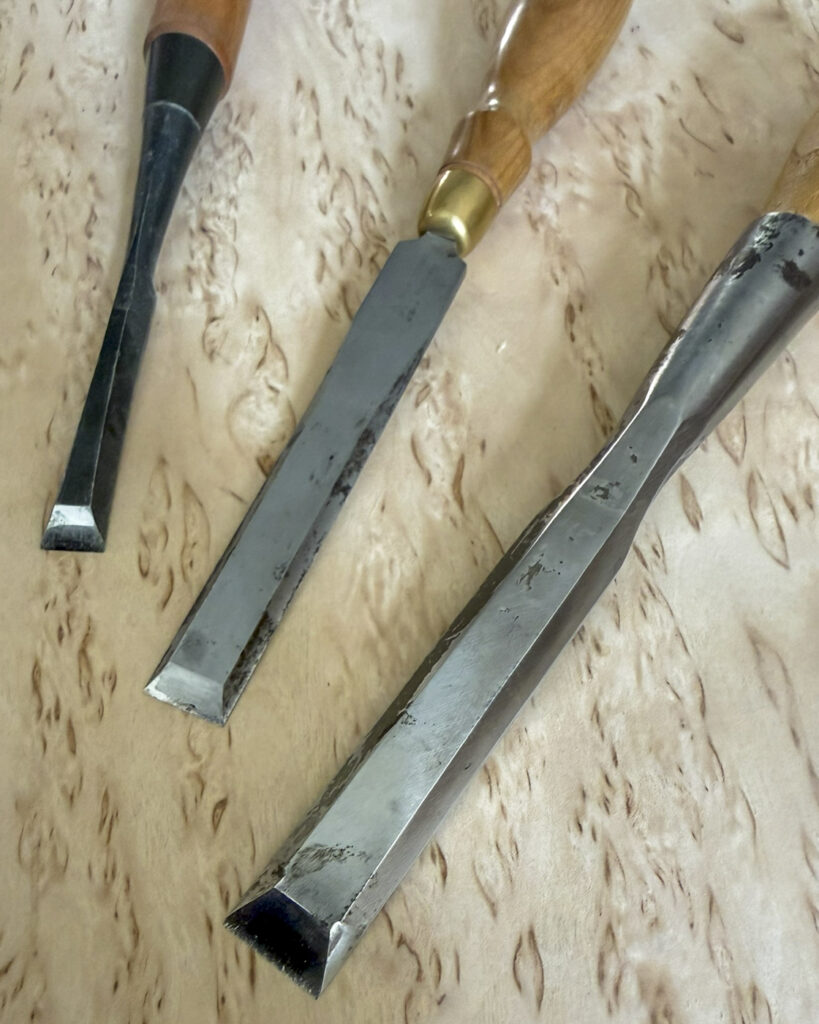
Chisels for dovetail joints are constructed so that their cross-section matches the sockets being chiseled. This is achieved either by heavily relieving the chisels, as in the case of my chisels that I work with — visible in the photos — or by using fishtail chisels.
This does not mean that it is impossible to correctly chisel the socket between the tails or the pins with other chisels. It will not, however, be as convenient as when using chisels intended for this type of work.
Ferrule reinforcing the handle
Although when making dovetail joints we work with a mallet, a ferrule on the chisel handle is not necessary. It is used primarily in chisels intended for intensive impact work, such as mortise chisels, where it protects the handle from cracking.
Chisel length
Choose a standard chisel length. The shorter it is, the harder it is to establish a right angle during work.
Steel
The steel used in chisels is a vast subject. If we exclude chisels made of low-quality steel, often found in hardware stores, its importance when choosing a tool becomes secondary. In simple terms, we can say that the quality of the steel mainly affects how long the tool holds an edge, but also how easy it is to sharpen and how resistant the edge is to damage.
I most often choose Blue Spruce Toolworks chisels, visible in the photos, even though they require much more frequent sharpening than hand-forged Japanese chisels, which I also own. Why? Because in the case of chisels intended for making dovetail joints, not only sharpness matters, but also the geometry of the edge, which allows precise work in narrow spaces. The chisels from this brand work best in my work.
How to chisel? Chiseling technique
Correct chiseling of the base line requires angle control, stable guidance of the chisel, and conscious work with the wood grain. This is a stage where it is easy to damage the joint, so it is worth working calmly and in stages. Avoiding compression and twisting of the chisel during work is particularly important.
Base line sections between the tails
The base line sections between the tails are the easiest to chisel. What you need to pay attention to is chisel compression and the angle at which you work.
Initial chiseling of the base line
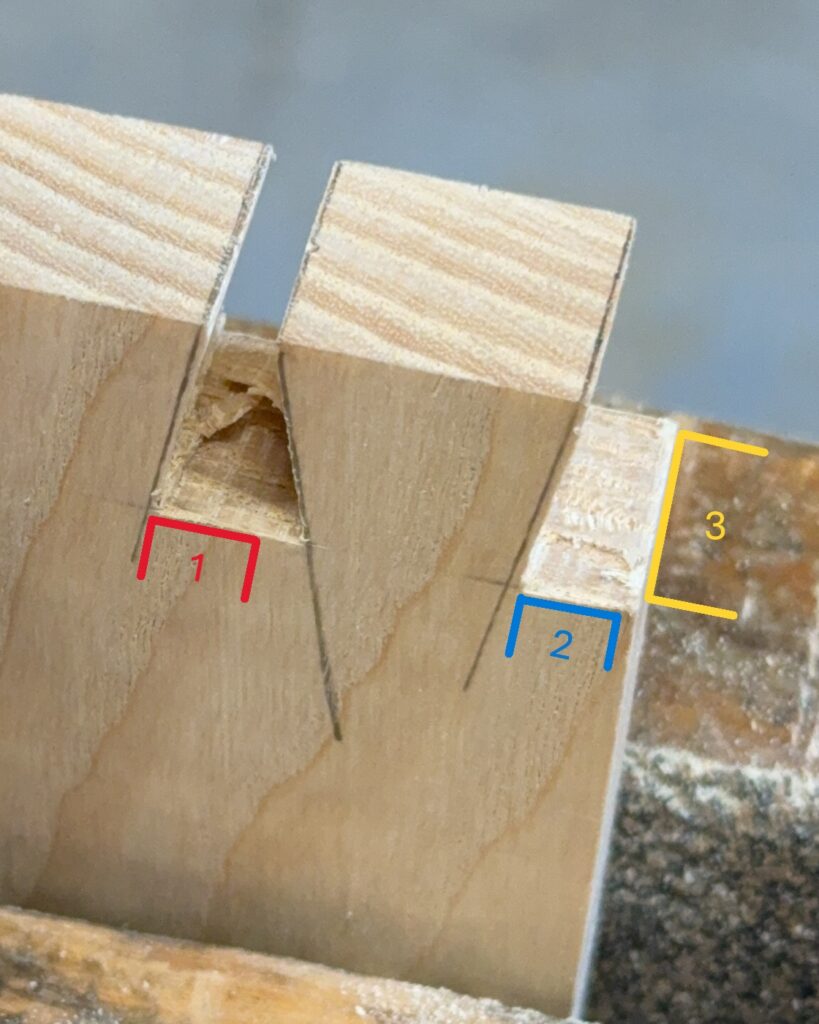
To avoid compression, remove excess material in front of the base line so as to eliminate the risk of damaging it. In photo 4, the fragments of the base line where there is too much material above it to proceed with chiseling are marked in red. The fragments of the base line that are suitable for direct chiseling are marked in blue.
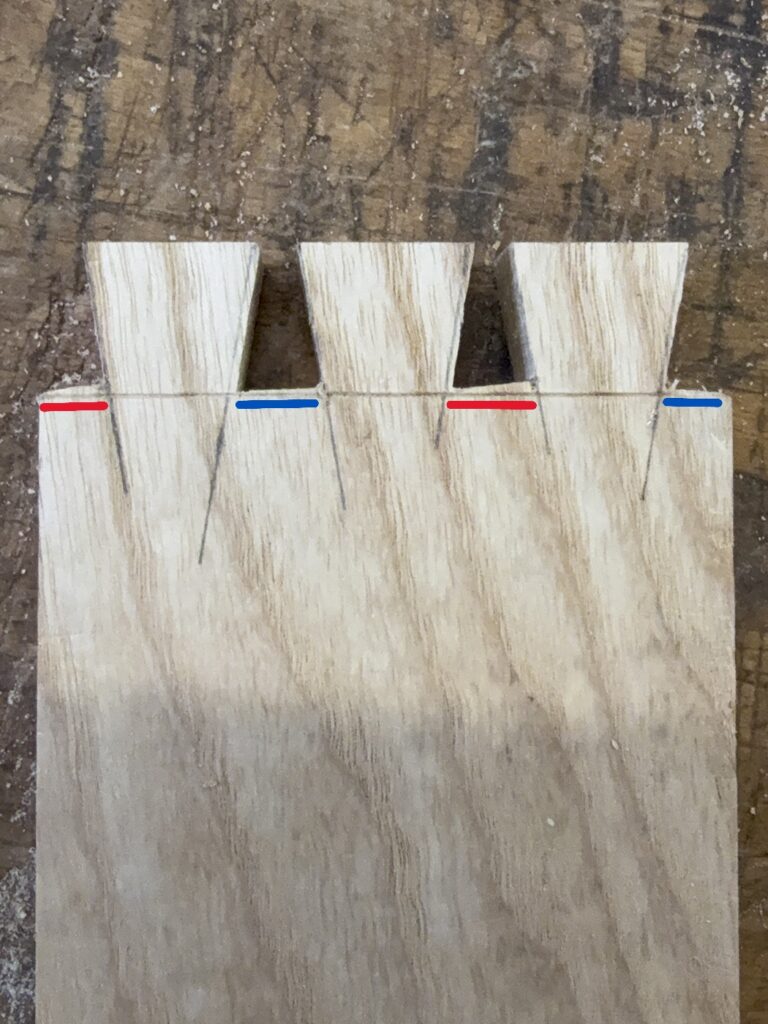
Watch out! Never take the risk and do not try to chisel the full depth of the socket. It is almost certain that tear-out will occur on the other side. Chisel slightly past half the width of the element.
Positioning the chisel in the line
Place the chisel in the base line right next to the edge of one of the tails. Check with a light hand movement, twisting left and right, whether the chisel sits in the line.
Establishing the chiseling angle
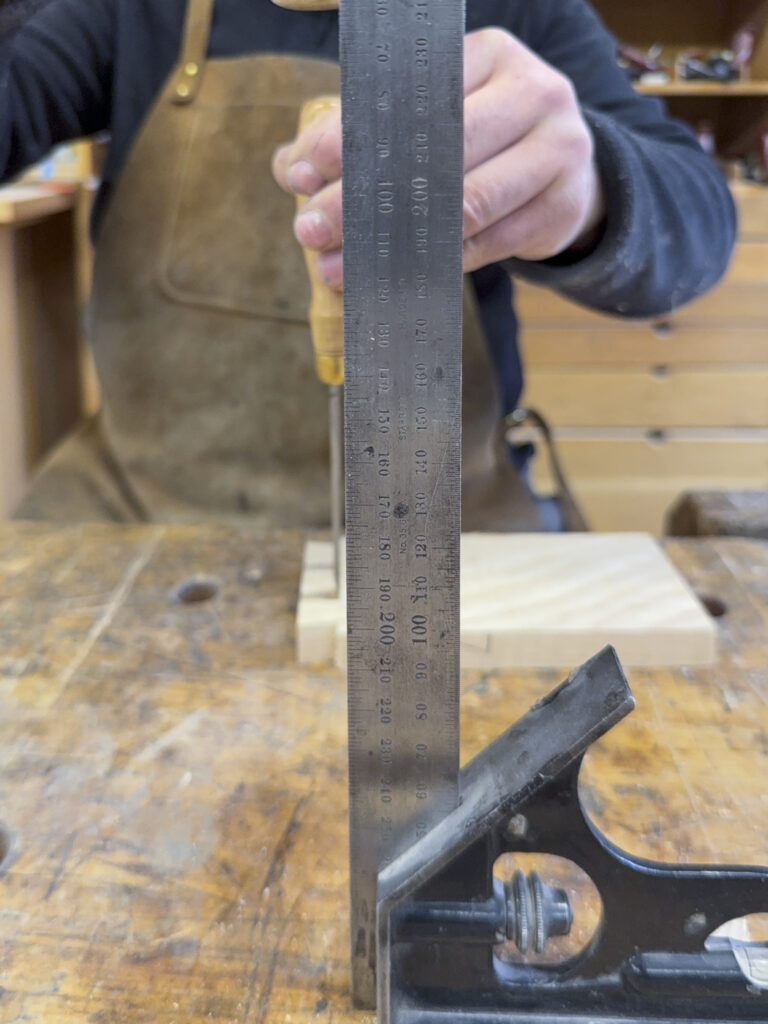
Now it is time to establish the angle. It should be either a right angle or an obtuse angle from the back side of the chisel — about 1–2 degrees. Thanks to this, the tails will enter the pins, and the pins will perfectly contact the base lines. If you have trouble establishing a right angle, place a square behind the chisel.
Striking technique and concentration
In woodworking, routine is a factor that reduces quality and leads to mistakes. It is especially easy to lose concentration when performing repetitive tasks.
To understand how professionals deal with this, it is worth looking at athletes. Tennis players perform dozens of serves during a match. Maintaining full focus all the time is impossible, so they have developed a method of switching between relaxation when there is no need to maintain attention and concentration when it is necessary.
Notice that almost every tennis player performs the same ritual before a strike. They bounce the ball twice on the ground, at the same time rocking on their feet in a precisely established rhythm and throwing the ball. All these actions are always performed in the same way. Why? Because it allows the body and mind to return to full focus for that fraction of a second when there will be no going back and they strike the ball. If something disrupts this ritual, they often repeat the entire sequence from the beginning. It is a conscious process that allows the mind to enter the highest level of focus exactly at the moment of the strike.
It is similar when chiseling. When you look at videos from my workshop, you will notice that first I position myself, grip the chisel and introduce it into the base line. With a delicate movement I check whether it is properly seated, while keeping the mallet ready the entire time. Then I make two very light strikes, which allow the tool to stabilize and let me enter full focus. Only after a moment does the proper strike follow. If something distracts me or I feel that the positioning is not perfect, I stop and start the whole process from the beginning. This approach allows me to chisel base lines all day without the risk of damaging them.
Watch out! In many situations, the chisel begins to spring on the material during work. When struck with the mallet, it bounces back, making a characteristic sound. Such springing can lead to damage to the base line. To avoid this, loosen the material in the clamp and press it down to the bench. You can also try pressing the chisel more firmly against the element.
Outer sections of the base line
Chiseling the ends of the base line is difficult because we must simultaneously control the line in which we have seated the chisel and the side line. Through years of practice and hundreds of meters of chiseled dovetail joints, I have developed a chiseling technique that leaves us with clean, precisely chiseled base lines. While maintaining all the comments about chiseling base lines between the tails, we introduce an additional method.
Chiseling the ends of the base line
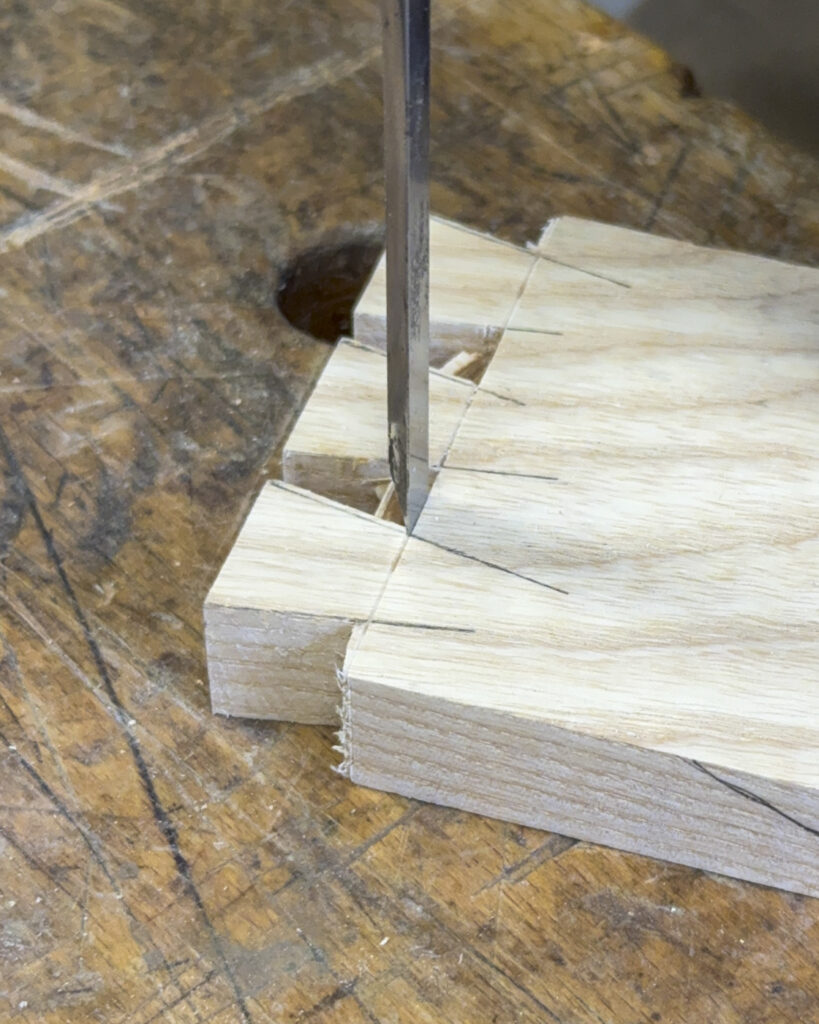
In the first step, we chisel the ends of the base lines next to the cross base line so that the chisel does not damage it. It is important to chisel about 1–2 mm, no more. We do the same on the other side.
Chiseling the cross base line
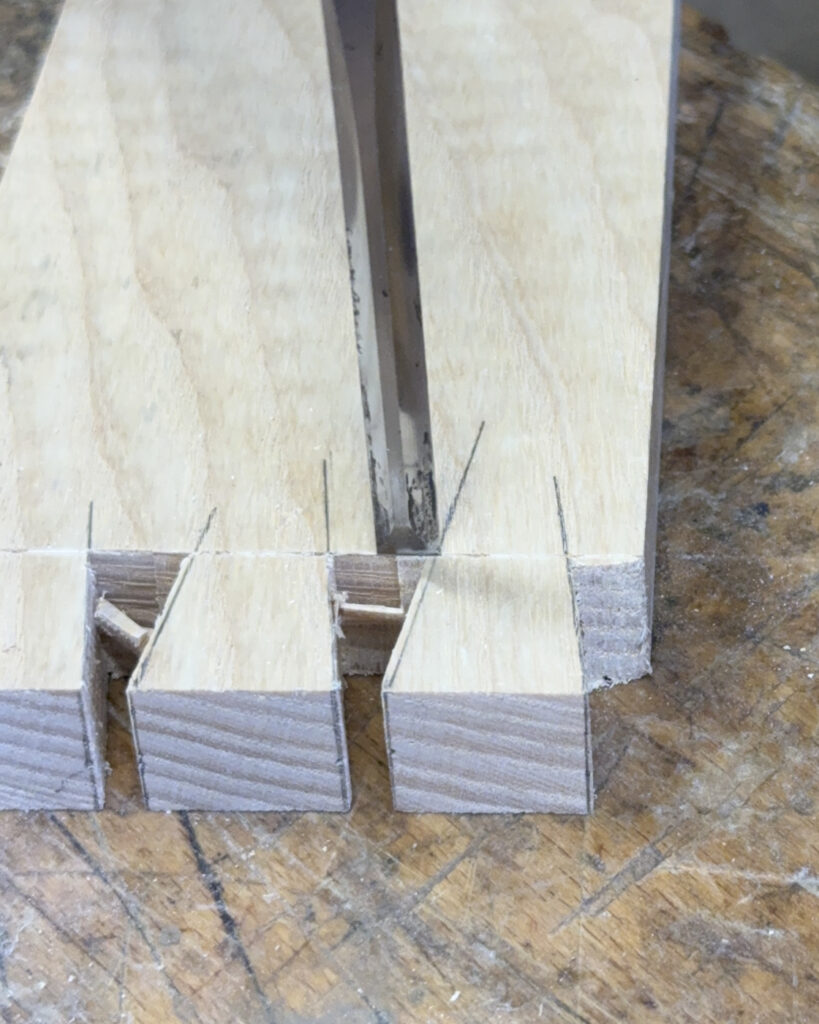
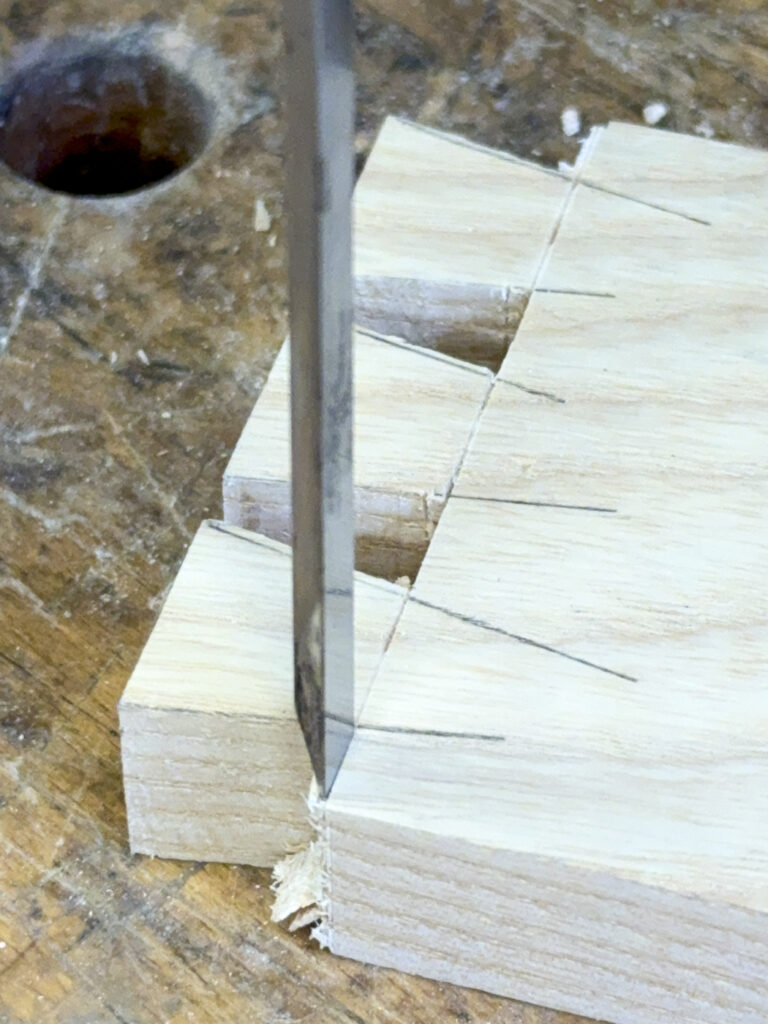
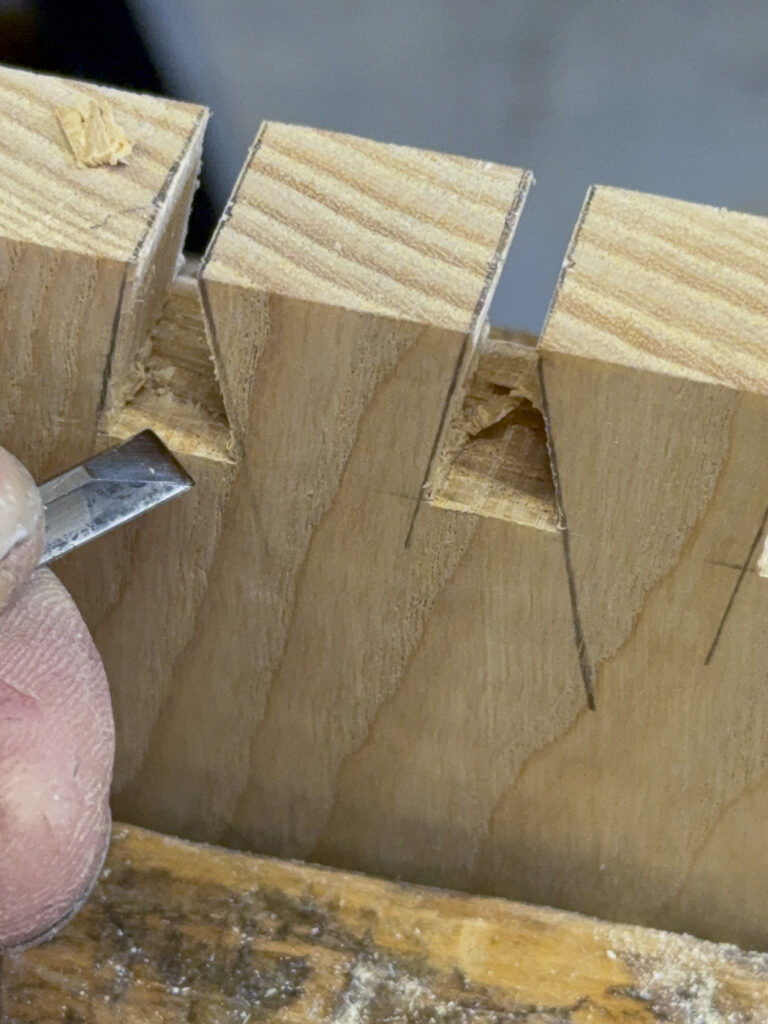
Once we have exposed the base lines from both sides, we place the element on its side and secure it in the clamp. We take the chisel intended for working on the section marked in yellow in photo 2 and, placing it between the side base lines, safely chisel out the waste. In this way, we can be sure that we will not damage any of the lines and that they will perfectly contact the corresponding element.
How to clean the tails and the base line?
Usually, after performing the operations described above, we need to check our tails and, if necessary, make corrections. Corrections are usually made without a mallet, unless there is a lot of material to remove.
The most common corrections are:
- correcting the sawing angle of the tail if it is not square — see the post: dovetail joints: sawing the tails step by step,
- removing waste from the corners,
- correcting the chiseling angle of the base lines if we were unable to establish it correctly and there is a hump in the sockets.
Correcting the angle of the tail after sawing
If you did not manage to maintain a right angle while sawing the tail, we still have a chance to correct it. We can do this with a chisel. However, remember that chiseling from the end-grain side along the grain, even though it seems the simplest, carries the risk of uncontrolled splitting and breaking off a piece of the tail. It is better to do this from the side of the tail. We correct the pins in the same way, which I will describe in the next parts.
Removing waste from the corners
To cleanly remove waste in the corner, we place the element in the clamp. We insert the chisel and align it to the side surface of the tail so that it fits perfectly against it. We lightly score the corner with the chisel.

Note!
- If you have a chisel wider than the width of the element, do it with that chisel. If not, do it in two passes — first from one side and then from the other.
- Do this gently, preferably without using a mallet. With this type of cut, there is a risk of splitting the element.
Tip: To simulate working with a narrower chisel, rock it left and right in the plane of its back while maintaining constant pressure.
Then take a narrower chisel and lightly undercut the waste in the corner, guiding the beveled edge of the chisel behind the base line.

Note! One of the most common mistakes is chiseling in such a way that part of the chisel edge goes beyond the base line. In this case, we unnecessarily risk damaging the base line. From this perspective, it is difficult to judge whether our chisel is moving in the plane established by the base line or whether it is slightly tilted and about to damage it.
Correcting the chiseling angle of the base lines
If, when chiseling the base lines between the tails, you did not manage to maintain the correct angle, it must be corrected so that the hump that formed there does not push the pins away from the base lines. To do this, insert the chisel and remove the excess material. Remember, do this halfway, turn the material over, and finish the rest from the other side.
Tip: If the socket between the tails is wide, you can chisel not by pushing the chisel forward, but sideways. This makes the cut much cleaner and at the same time gives us greater control over the chisel.
The most common mistakes when chiseling
Chisel too wide
A chisel that is too wide can damage the tails or the base line, especially if its cross-section does not correspond to the shape of the socket.
Twisting the chisel during work
Twisting the chisel most often results from uneven resistance acting on the edge. Hold the chisel steadily and do not let it rotate in the line.
Going beyond the base line with the edge
The chisel edge should work behind the base line. Going beyond it significantly increases the risk of damaging the visible edge of the joint.
Chiseling to full depth
Do not chisel through the entire thickness of the element at once. Work slightly past half the width, turn the material over, and finish from the other side.
Next stage: making the pins
That is all for this part. We have finished preparing the tails and now it is time to make the corresponding element — the pins. That will be covered in the next parts.
